With the advancement in mapping technology, there are more features than we can comprehend. Each feature has its unique benefit, and we often would like to utilize several features simultaneously as users. A good map is created when all the layers come together to create a visual compilation of all the essential data. Map layers are an essential tool for in-depth analysis that helps obtain a clear overlay of different and specific geographical data for better navigation and decision-making. Avenza Maps has made managing map layers simple and hassle-free for our iOS and Android users.
Why do we need Map Layers?
Every user and every map has a unique objective. Having your own distinct interests highlighted on your map when embarking on a big or small expedition makes the experience more enjoyable. You can have a wide range of specifications and points of interest with map layers, and they can be useful for one or more of the maps on your list. You can concentrate on a particular element and manage it to suit your needs with the aid of Map Layers. Your plan will look and feel more organized with Map Layers.
Have you explored the manage map layer option on Avenza Maps? If you're a new visitor, the details provided below will help you understand and use the features of managing map layers with Avenza Maps, and if you're already a pro user, here's a quick refresher.
Managing Map Layers
In the Avenza Maps app, there are two locations to access and manage the layers. To manage layers directly in the map they’re linked to, use the Map Layers menu in the Map View. Alternatively, use the Layers tab to manage all layers regardless of the map.

You can search, toggle, edit, move, add, delete, link, and unlink layers in addition to viewing them. It is important to understand the basics of managing layers to enjoy the app without any hindrance. Layer management is simple, and this feature in Avenza Maps App can be put to good use in a few easy steps.
Create an Empty Layer
One of the first steps to managing layers on Avenza Maps is creating an empty layer. The empty layer can be filled with the data of your choice. To create a new and empty layer tap the + icon at the top of the screen on an iOS device or the orange circle with the three lines on an Android device and then tap create layer. Once the new layer is created, a pop-up box will appear providing you with an option to rename the layer as you desire. By default, the name is set to “Layer”. You can click OK once you are ready to create the layer. It is important to note that this newly created layer will not be the active layer for data collection.
Search for Layers
Once layers are created and you are ready to go out and explore trails, there might be a need to find a particular layer. When there are multiple layers it can be chaotic trying to find a specific layer at a critical moment. Finding a layer quickly contributes to a pleasant user experience. Searching for layers is as simple as the name implies. Layers can be found by typing the name in the search bar for iOS users or by tapping on the search icon for Android users. This is a quick and efficient way to find a specific layer in the Avenza Maps app.
Toggle Layer Visibility
Switching between layers is essential when working with different map layers. At times, you might not need to have all the layers visible. You can set a layer to be invisible by tapping the eye icon next to the layer’s name in the Map Layers menu. Once a layer is set to invisible, the eye icon will turn gray and be crossed out so you can clearly distinguish between visible and invisible layers. It is important to know that visibility cannot be toggled from the general Layers tab.
Move a Layer
Layers can be moved and organized according to a user's personal preferences. In the Avenza Maps app, a layer can be moved to another position by following simple and easy steps. To move a layer, a user needs to tap the three dots and tap 'move' from the option list. After tapping, the layer tree will emerge, allowing the user to select the destination to which the feature(s) should be moved. Once a decision has been made, all the user needs to do is tap on the desired layer in the layer tree.
A notice asking if you want the styles from the destination layer to be applied to the new features will appear. The features will correctly transfer and adopt the styling of the destination layer if you choose Yes, but if you choose No, the features will move but keep their original styling.
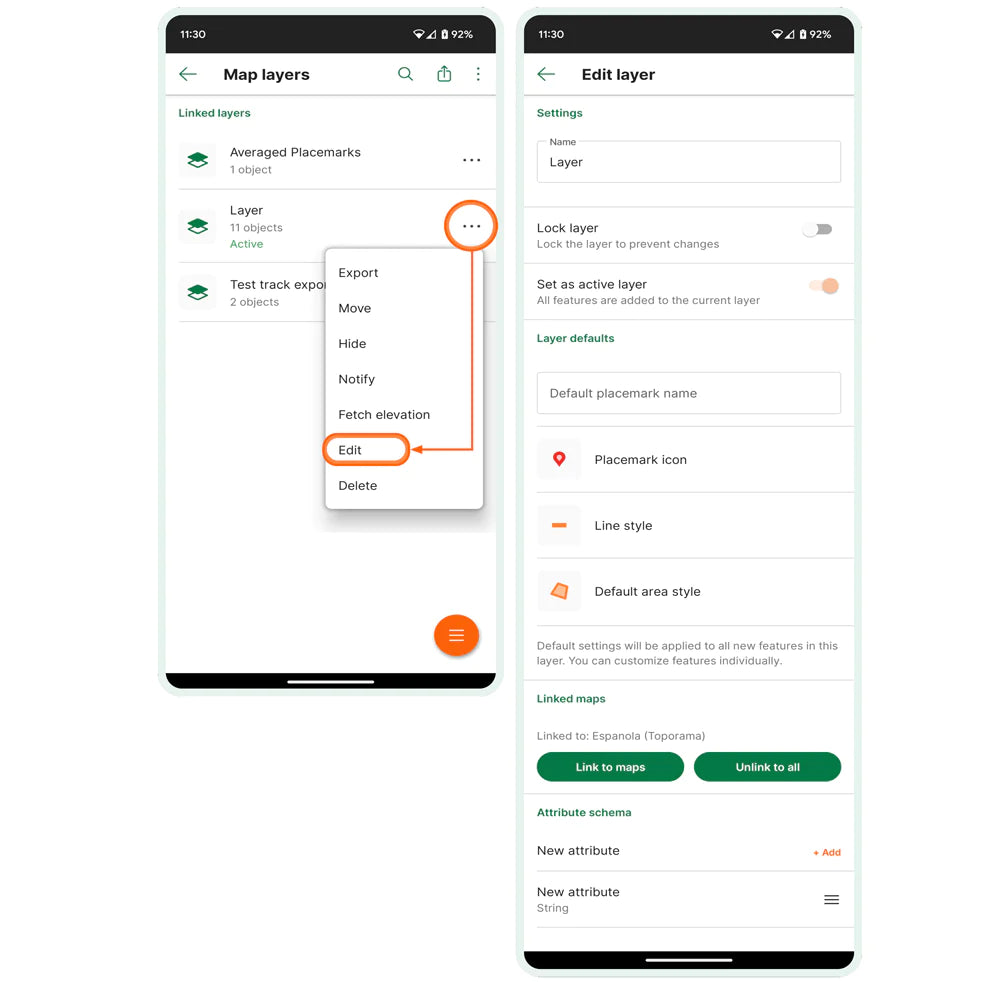
Edit Layers
While managing map layers, editing layers is one of the most often utilized features. Some functionalities turn out to be the most popular despite appearing to be trivial. Renaming a layer, changing its default symbology, locking and activating layers, selecting which map(s) to link, and defining attributes are some of the options available when editing a layer.
Layers can be edited from the Layers tab or Map Layers menu on Android or iOS.
- Tap the three dots beside the layer you wish to edit
- Tap Edit to bring up the edit layer page
Make a Layer Active
Another important feature to know while managing map layers is making a layer active. Any new features you create while collecting data in the field will be kept in the active layer. To collect data in a specific layer, you must first activate the layer. Irrespective of whether you're using an Android or an iOS device, the procedures listed below can be used to activate a layer from the Map layers menu.
- Tap the three dots beside the layer that needs to be active
- Tap 'Set as active'
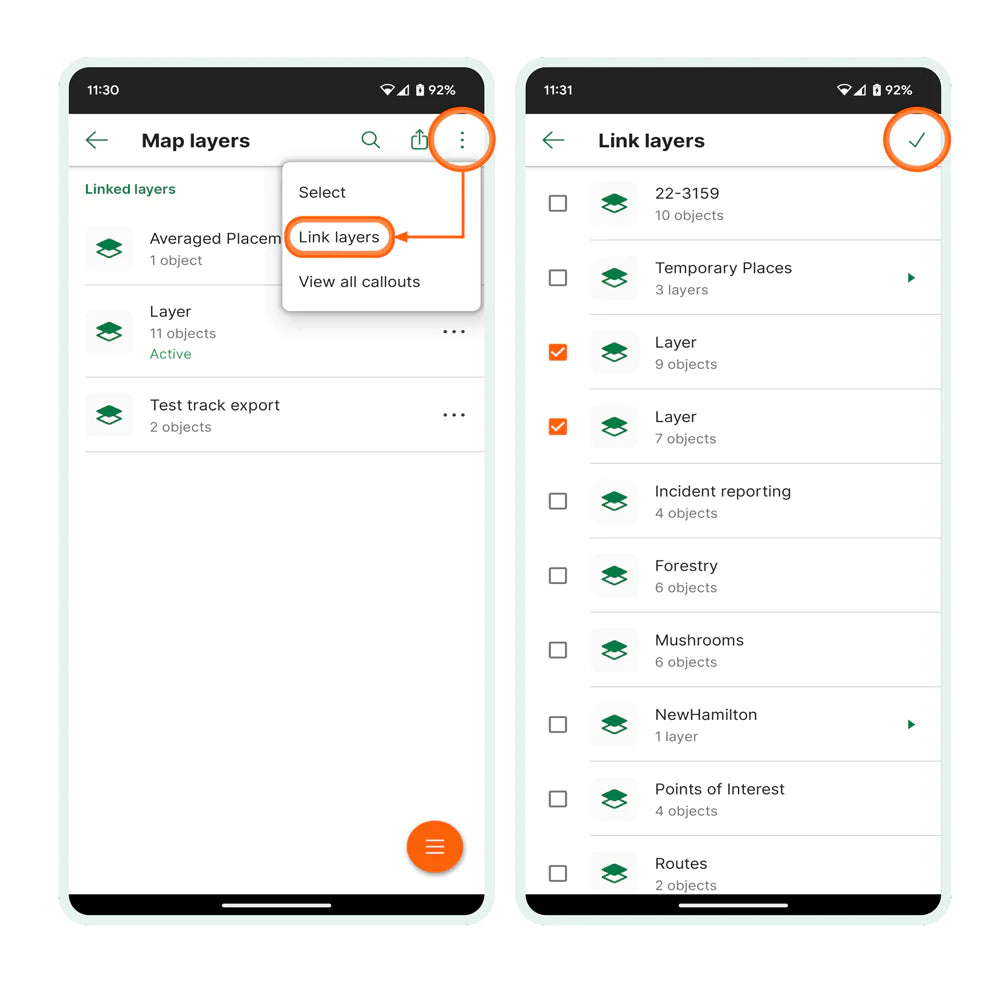
Link and Unlink Layers
Linking and unlinking layers is a feature that can aid in demonstrating the connection between two or more layers in a map. Layers can be easily linked and unlinked to any map, but they won't be displayed if their features are outside the map's geographic bounds at the time you're viewing it.
There are two methods for linking layers to a map. You can link numerous layers to the map you’re presently working on using the Map Layers menu in the first method, and you can link a single layer to multiple maps by directly modifying the layer in the second method.
Linking several layers to a map on Android or iOS:
- Open the map you want to link layers to
- Tap the three dots
- Tap the link layers icon
- Select all the layers to link to the current map (or deselect any layers you want to unlink), and tap the checkmark icon or ‘Apply’ to confirm
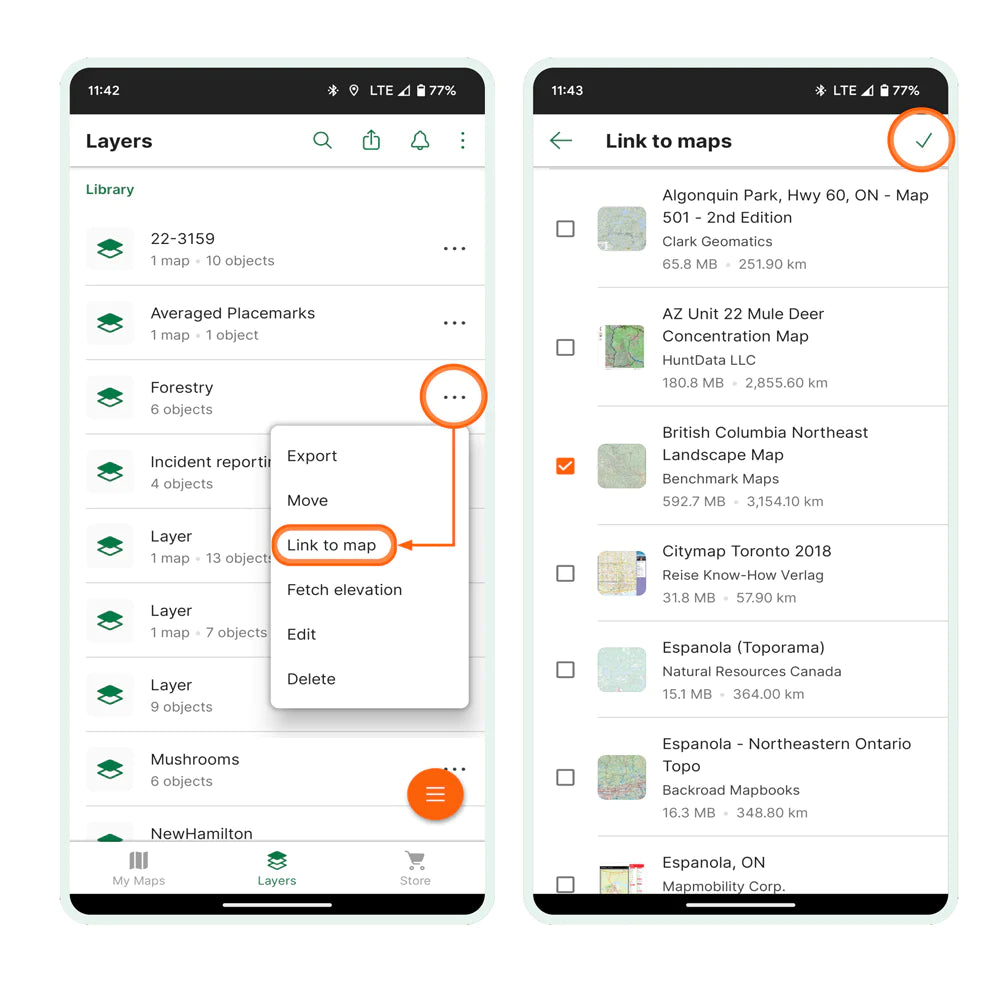
Linking a layer to several maps:
- Find the layer you want to link in either the Map Layers menu or the Layers tab
- From the Layers tab, tap the three dots and select 'Link to maps' or from the Map Layers tab, tap the three dots beside the layer, then tap Edit
- Scroll down and tap ‘Link to maps’
- Select all the maps to link the current layer to (or deselect any maps you want to unlink), and tap the checkmark icon or ‘Apply’ to confirm.
Delete a Layer
Understanding how to remove a layer that is no longer required or was unintentionally produced is crucial in managing map layers. When you organize the map layers and remove any unnecessary ones, your experience will be better. On the Avenza Maps App, you can delete a layer depending on whether you're using an Android or an iOS device as listed below:
- Tap the three dots on the top right, then tap Delete
- In the warning message, tap Delete to confirm your choice
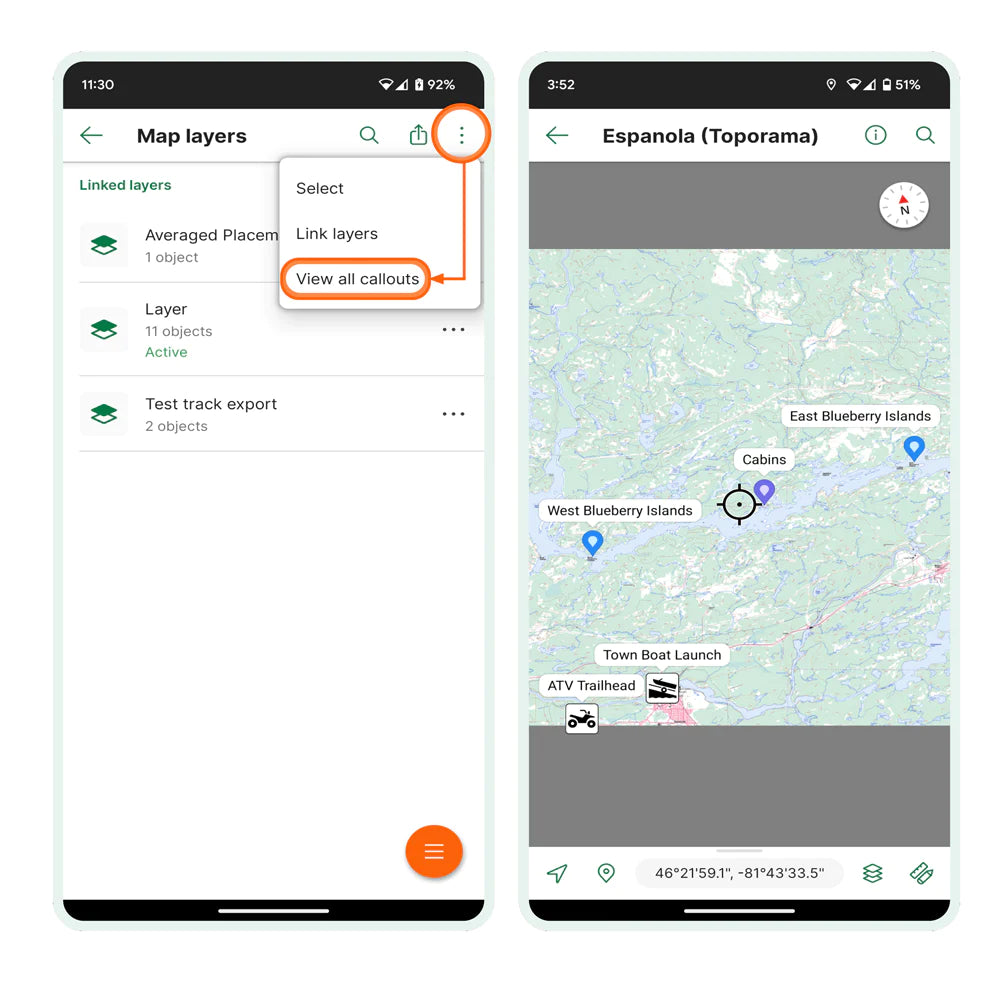
View All Callouts
Users can now view all feature callouts/labels located on a map. This option can be accessed through the Map Layers tab by tapping the three dots. Select 'View all Callouts' from the menu, and each feature on the map will have its label shown. Tapping anywhere on the map will hide all feature callouts.
Did you enjoy learning how to manage map layers? Would you like to know more about our other features? Here is a quick guide on how to add a placemark with Avenza Maps.
Download Avenza Maps the Best App for Managing Layers
We're sure you have some exciting activities coming up with spring just around the corner. Now that you are aware of how simple it is to manage map layers, be sure to explore Avenza Maps and tell us about your experiences using the app.
Download Avenza Maps, the #1 app for hiking, biking and all trails and enjoy an organized and hassle-free adventure.
 Scan this QR code to download the Avenza Maps app.